
This is a quick start guide on how to edit pages and content on the new Gateway site using CloudCannon's Content Management System.
Topics Covered
- Introduction
- Getting Started: Logging in and Finding Your Pages
- Editing Text Content: Titles, Descriptions, and Content Sections
- URL Paths and Redirects
- Adding and Editing Images
- Default Page Image Settings
- Saving and Publishing Your Changes
- Workflow Example: Updating the How to Apply Page
- Tips and Troubleshooting
- Coming Soon
- Sources
Introduction
The new Gateway website uses CloudCannon for all Gateway content. A basic CloudCannon framework is set up like this:
- Gateway site
- Unit content pages hosted in their "branch" of the Gateway site
- Other Unit content pages hosted in a different "branch" of the Gateway site
Each Branch is hosted in the CloudCannon Site area. These are not actually separate sites, but are how CloudCannon refers to the sub-sections of pages for the entire Gateway website.
If you're new to CloudCannon: The CloudCannon publishing workflow is different from Drupal's. Editing and saving a page does not make those edits published and visible to external site visitors.
The new CloudCannon process works like this:
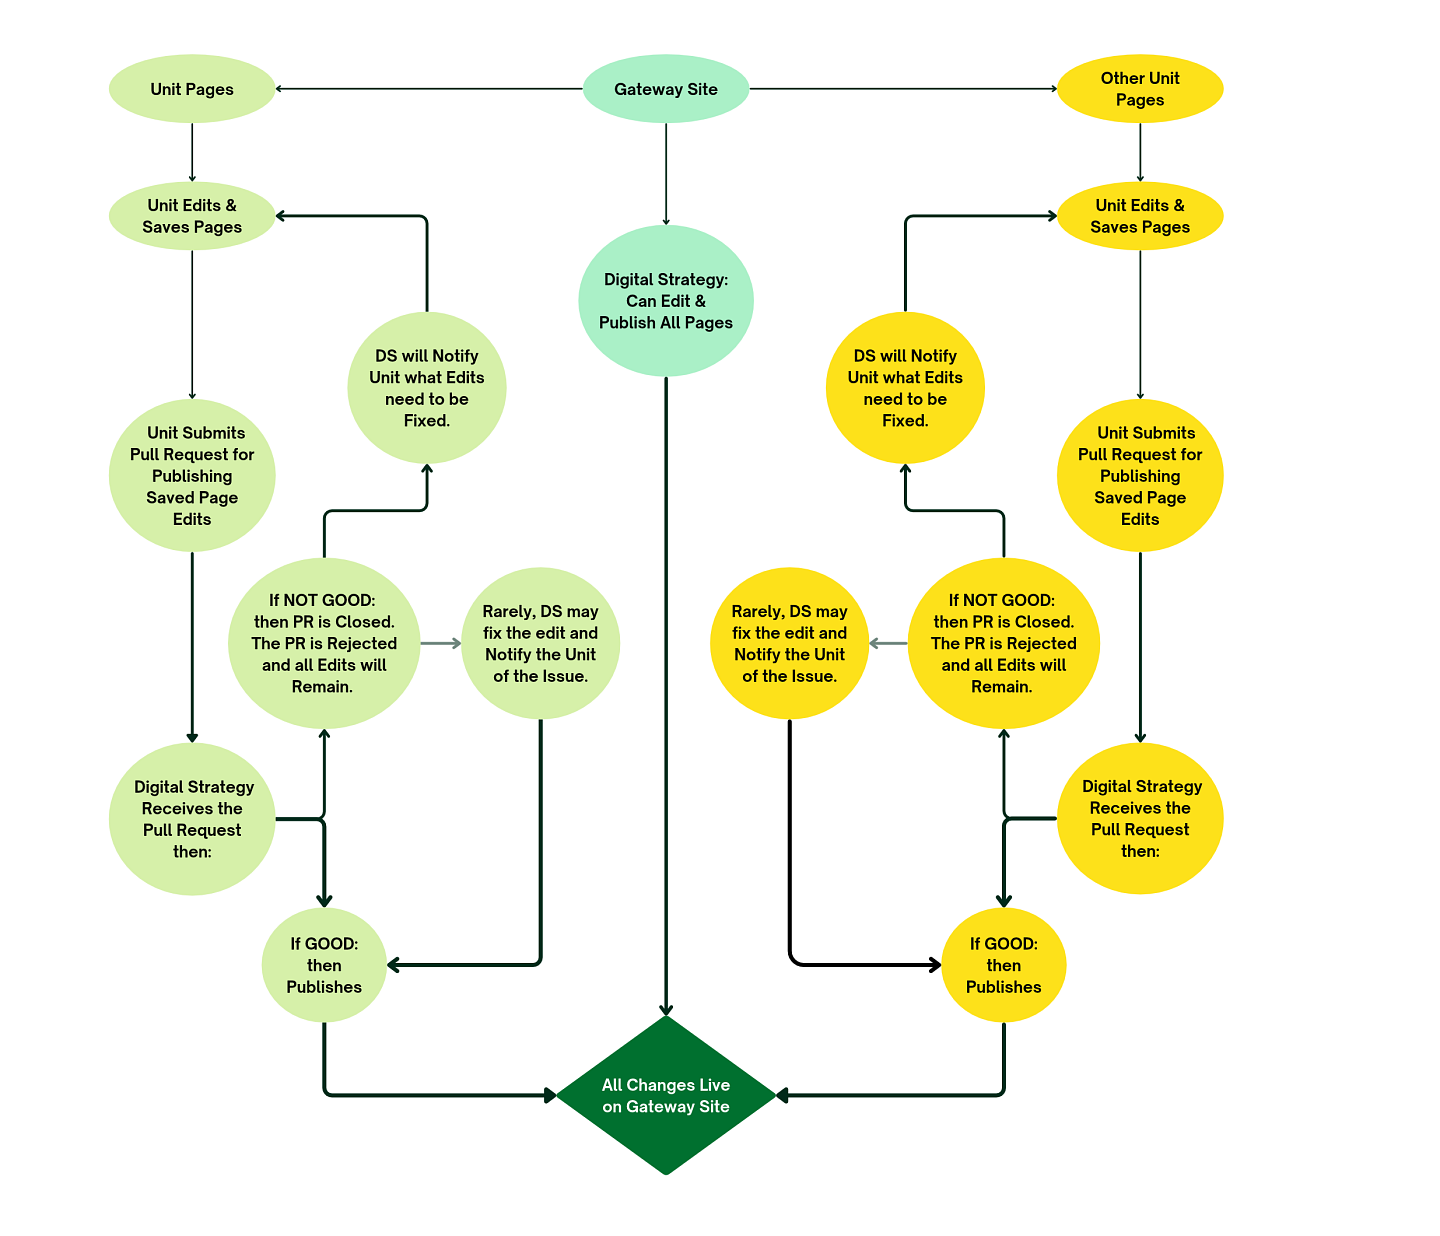
- Content is edited on a page.
- The page is saved and those edits are now staged on that Unit's content section (branch).
- Someone in a Unit submits a Pull Request for the saved edits in that Unit's content section (branch).
NOTE: This request will include all saved edits for the Unit's content section (branch), not just the edits of the person who submits the Pull Request. - The CloudCannon approvers and awareness teams receives the Pull Request for that content section (branch) in an email, they review all edited content, and then Publishes the Pull Request so that all that Unit's saved edits are now active on the Gateway website.
Remember, saved edits are not live until the Pull Request is published. Read more about this in the Saving and Publishing Your Changes section.
Getting Started: Logging in and Finding Your Pages
Follow these steps to log in and find the page you want to edit.
- Go to the CloudCannon website and log in using your UO Duck ID login.
After logging in with your UO Duck ID, you'll usually land on the CloudCannon dashboard.
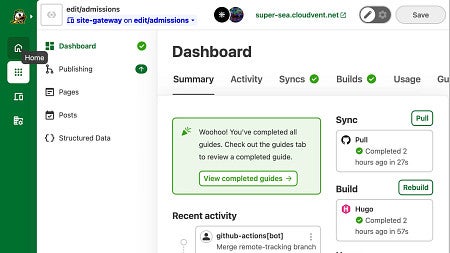
- If the CloudCannon Unit's content section (branch) or "site" you want isn't listed on this page, select Sites from the CloudCannon side menu items to find a list of all sites you have access to.
- Select your Unit's content section (branch), or "site", from the list of CloudCannon sites.
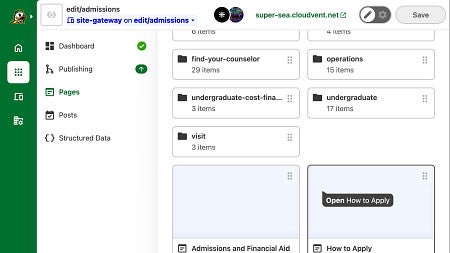
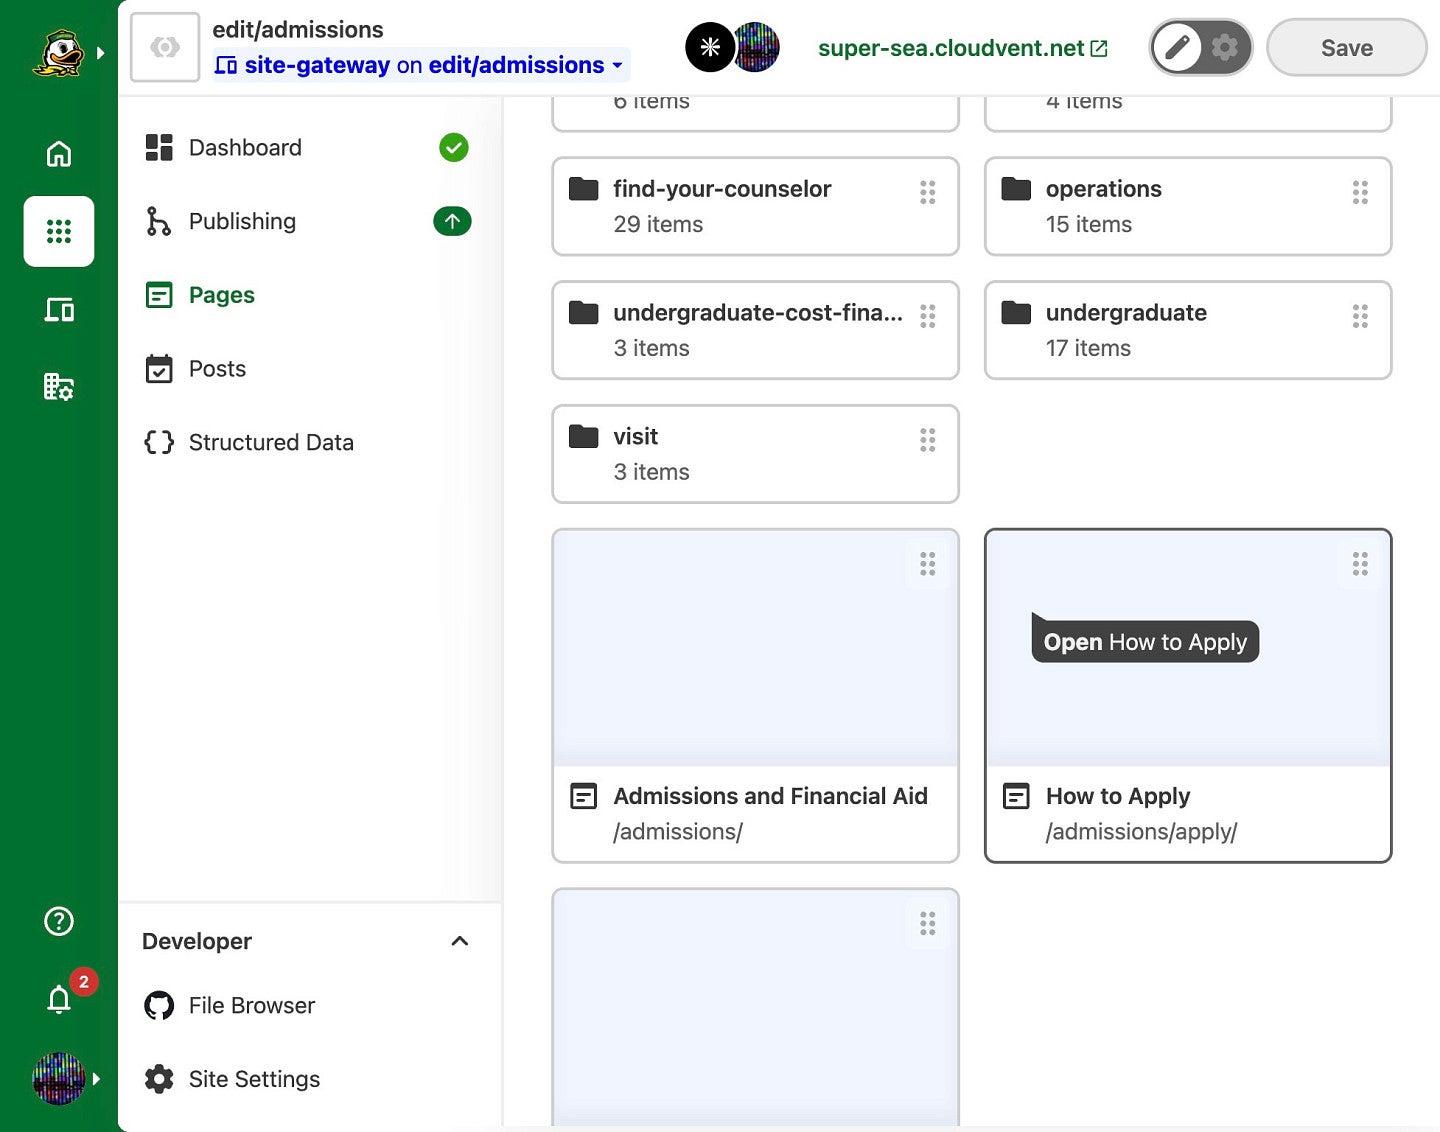
- Select Pages to browse the pages and folders in your Unit's content section (branch).
- Click on folder(s) to open a location that holds the page you are looking for, such as "admissions" if your page is under an Admissions section. You can also type into the search box to help make finding pages or sections with that text easier.
- Click on the page item that you want to edit. All of that page's content is selectable, from the page's tile, image, or description and will take you to that item's edit page.
Once you select a page, CloudCannon opens it in the CloudCannon content editor.
More details can also be found in the CloudCannon help documentation in the Resources Links.
Editing Text Content
CloudCannon gives you two ways to edit a page: the Data Editor and the Visual Editor.
- The Data Editor lists all of a page's content as text fields, similar to what you might experience on a regular web form.
- The Visual Editor shows those same fields in a digital version of the real page, so you can visualize the content and changes to that page. This editor is the closest to the Drupal Editor.
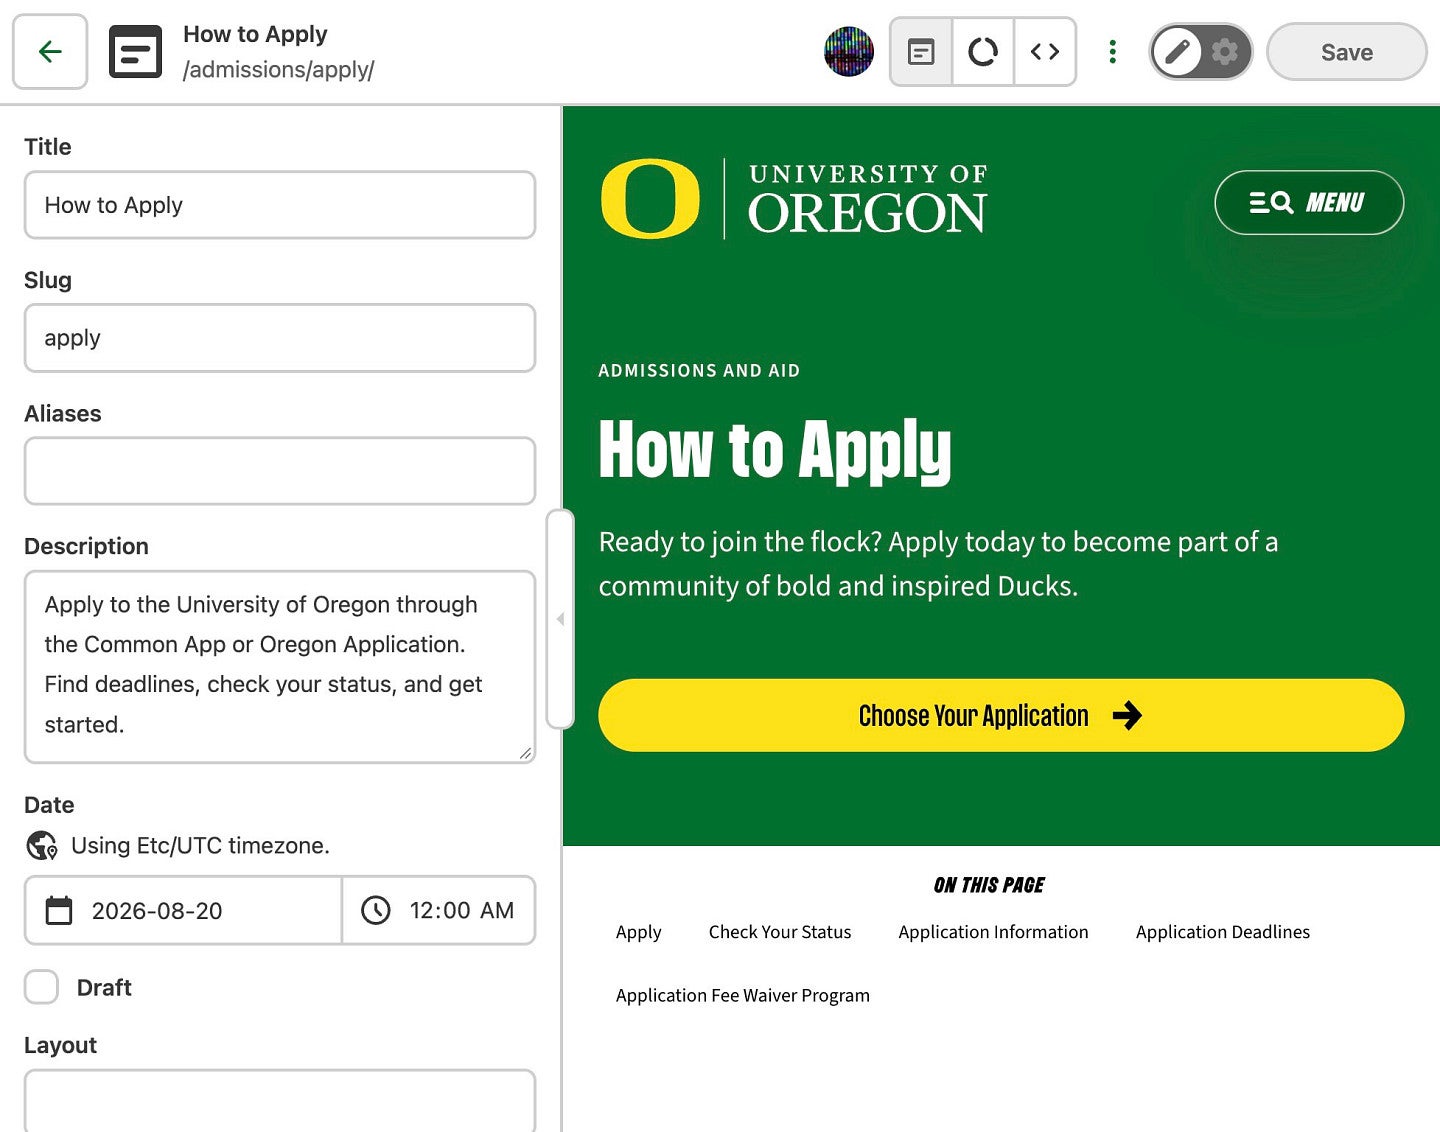
Both CloudCannon editors work the same way once you're inside a field and making edits.
Links
If you are linking to content within the Gateway website you can either use the built in navigation in CloudCanon, or you can manually copy and paste the URL if the existing page is not one that you have editing access to.
An example of this would be if an editor of an Education page wanted to link to an Admissions page.
- They would copy the URL of the page, which might be something like:
www.uoregon.edu/admissions/undergraduate/ - They would then remove the first part of the URL and only need to enter in the relative URL of the link:
/admissions/undergraduate/
Links to external pages not on the Gateway website would be entered in exactly as they are, such as if you were linking to somewhere like maps.uoregon.edu/ or another page outside of uoregon website domains.
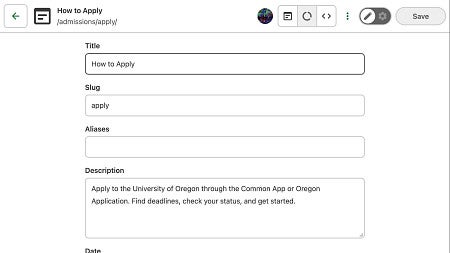
Titles and Descriptions
Many items have text you can edit, including Titles, Descriptions, Labels, and Headings.
- Titles and Headings are usually things like your page title, shown at the top of the page and in browser tabs, or it might be the heading used for a Molecule or other Component item.
- Descriptions and Labels are the short summaries search engines show for the page that should be clear and specific as it is often the first thing a visitor reads before they click through. Your content Labels serve similar purposes but are generally your link texts that tell your users where that item goes.
Content Sections and Molecules
A page is built from content sections. CloudCannon calls these "blocks," and be named things like "Hero - Minimal" in the editor. Click on a section to open it, and each block is composed of other items Molecules which can have things like headings, images, body text, and call-to-action (CTA) buttons. All of these should follow the same rules we use in Drupal when creating or editing content on those sites.
- Headings should follow a standard order (don't skip from a top-level H2 heading straight to an H4 sub-sub-heading) and are generally short.
- Body text can run longer, but preview it at a few screen sizes to make sure it still reads well, especially on mobile.
- Breadcrumbs are the page-location links at the top of the site (for example, Admissions → How to Apply). Update these URLs or labels the same way you'd edit any other field.
- Use the Back link at the top of the panel to return to the previous section, or select the X in the top right to close that edit section entirely.
URL Paths and Redirects
Every page has a URL path at the top of the editing page, set in the Slug field (combined with its folder location — for example, /admissions/apply/). Changing this field changes the page's live web address.
Changing the path does not automatically redirect the old URL like it does in Drupal. If you rename a page's slug or move it to a different folder, anyone who visits the old address gets a broken link (a 404) unless a redirect is set up separately.
Right now, creating a redirect is a manual step and one of the Digital team members has to set it up as it isn't something you can do yourself in CloudCannon, so you should plan out any URL updates and include the Digital team if you are renaming a URL, especially if you think you might need a new redirect.
Before changing a page's URL path:
- Check whether the page is already linked from elsewhere on the site, in print materials, email campaigns, or external sites.
- If it is, contact the digital team to set up a redirect from the old URL to the new one, before you make the change.
Adding and Editing Images
All images must be resized and cropped prior to uploading to CloudCannon as there are currently no crop or image resize options in CloudCannon.
Images can be found inside the same content sections and Molecules described above. For example, you might need to update an image in a page's "Hero" section. To do this, while in an editor you would select the image field item to open it, then do one of three methods to update your image:
- Drag an image file from your computer onto the image drop area, or
- Select the + Add file to either upload a new image from your computer or choose an existing one from the file browser, or
- Paste an image URL directly into the "Image source" field (such as if you wanted to use the same image from another section of the Gateway site but do not have access to that section of the Gateway site).
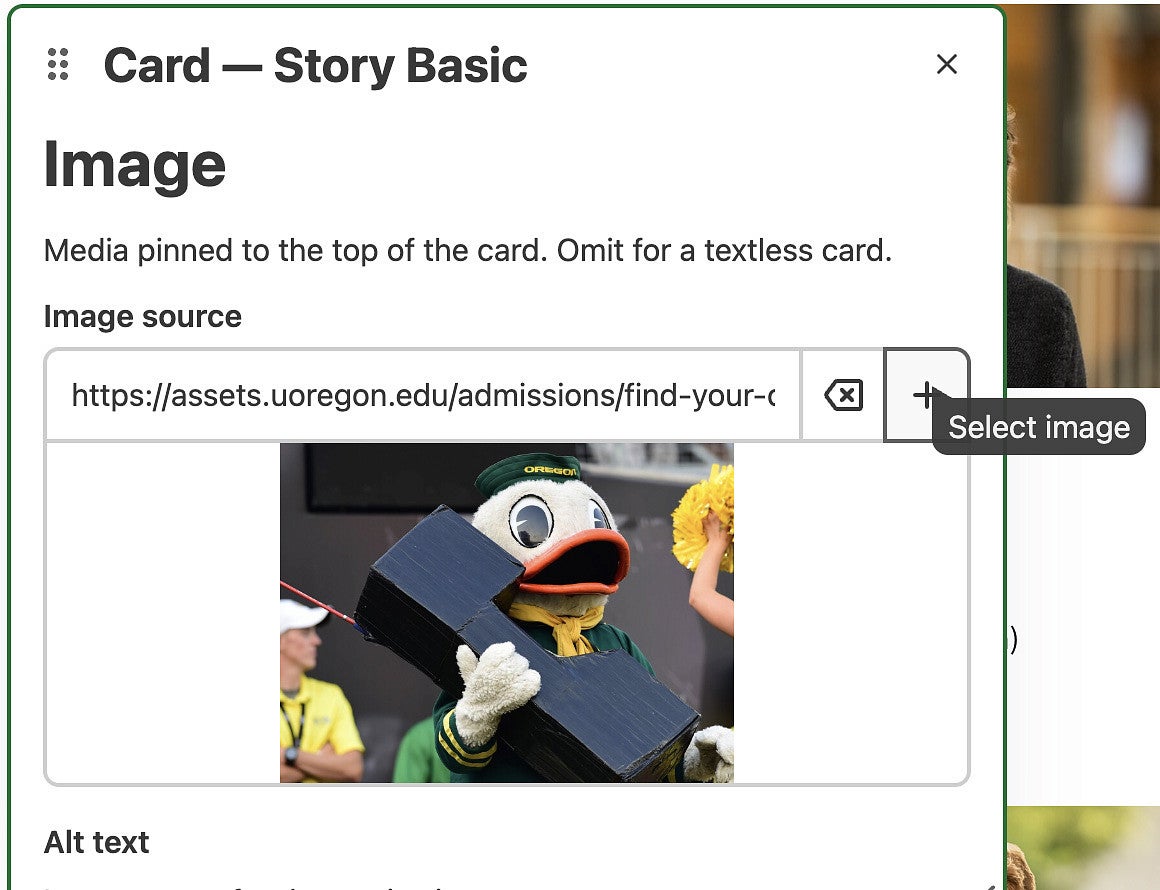
Choose a relevant photo and try to avoid generic stock art, although images from the UO Canto brand folder are generally ok to use. Ensure every image has clear, descriptive alt text (one sentence, ideally under 16 words) so screen readers can describe it and search engines know what the image contains.
Images must have a "human readable" file name so that other site editors can understand the purpose of the image. A good example of a file name would be:
Autzen-Walking-tour-2026-web-large-16x9.jpg
This filename tells someone that it was: taken in 2026, shows a walking tour group near Autzen stadium, is for a large web image, and is cropped to a 16x9 ratio.
The image ratios we generally use on the Gateway website are:
- 4:3 or 3:4
- 3:2 or 2:3
- 16:9 or 9:16
- 5:7 or 7:5
- 1:1
Crop your image to the closest ratio for that template area and CloudCannon will center your image in that template area. CloudCannon does not have a crop or a focus option, so cropping your image manually outside of CloudCannon is the only option for ensuring your images are using the correct aspect ratio.
Just like in Drupal, we still try to keep our image file sizes as small as we can while preserving image quality, so always make sure that you consider your image location when resizing and uploading your images images since you would never need to use a 2 MB image for an image that is being used for a small portrait of someone.
More details: CloudCannon's File input article, and UO's Images guidance for choosing and naming images.
Default Page Image Settings
By default, search engines and social sharing sites do not always choose the best images from your pages, or in some cases, do not pick any image to use and so no image is displayed. Since this does not present the best user experience, we recommend manually selecting an image to use through the Schema & Metadata editor section of your page.
The Schema & Metadata editor can be found in either the Data Editor view, or in the Sidebar Editor of the Visual Editor. Both editing locations have the same options to set, or update, the default image for your page and will use the standard CloudCannon image selection process.
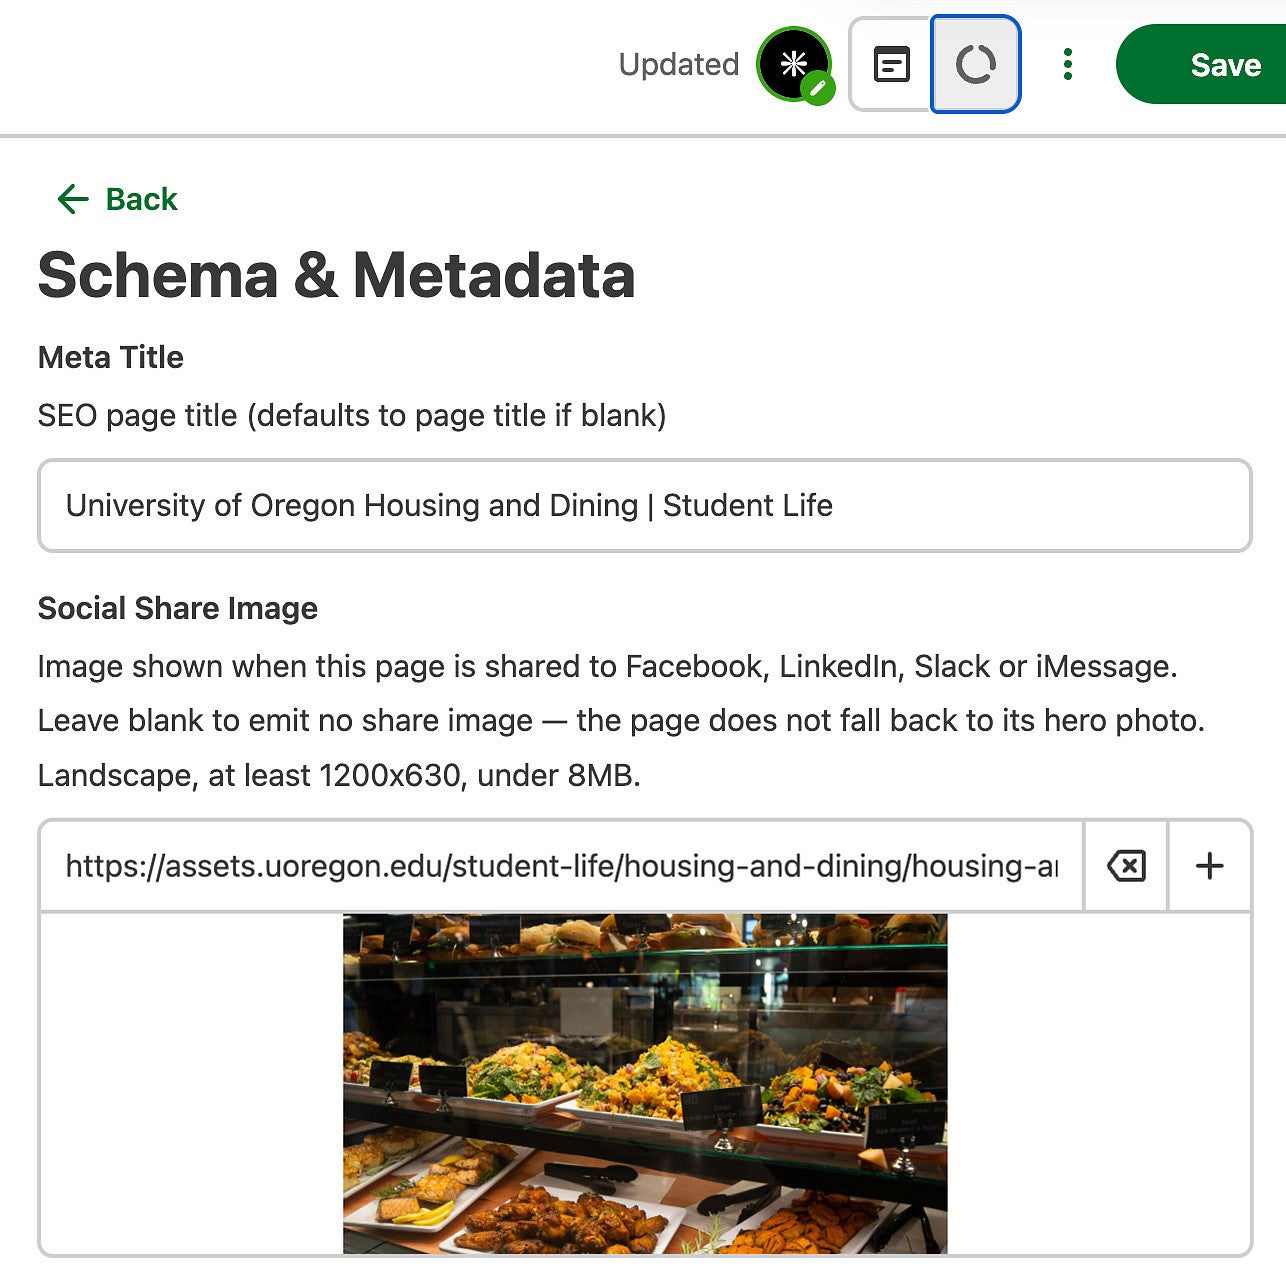
If you don't set an image, your page may look something like this example:

Saving and Publishing Your Changes
Every edit page has a Save button in the top right corner. Select it to both save your changes and and see what other pages may also have been edited. Saving a page will stage your edits in your site, but it will not make those changes appear on the Gateway site as you will need to also submit a Pull Request for those changes to appear.
All of our Units use a Publishing Workflow, meaning they are only editing their Unit''s site content on a branched version of the Gateway site. Units will submit a Pull Request, the changes will be reviewed by an Approver, and if those edits are good, will be Published when they are all ready.
More detail: Our Publishing Workflow section and CloudCannon's Introduction to Syncing & Publishing and Save your changes articles.
Working Example: Updating the How to Apply Page
This walkthrough updates the How to Apply admissions page, start to finish.
Find the Page
- Log in to CloudCannon. You'll land on your dashboard.
- If you don't see your site listed, select Sites.
- Select your site from the list.
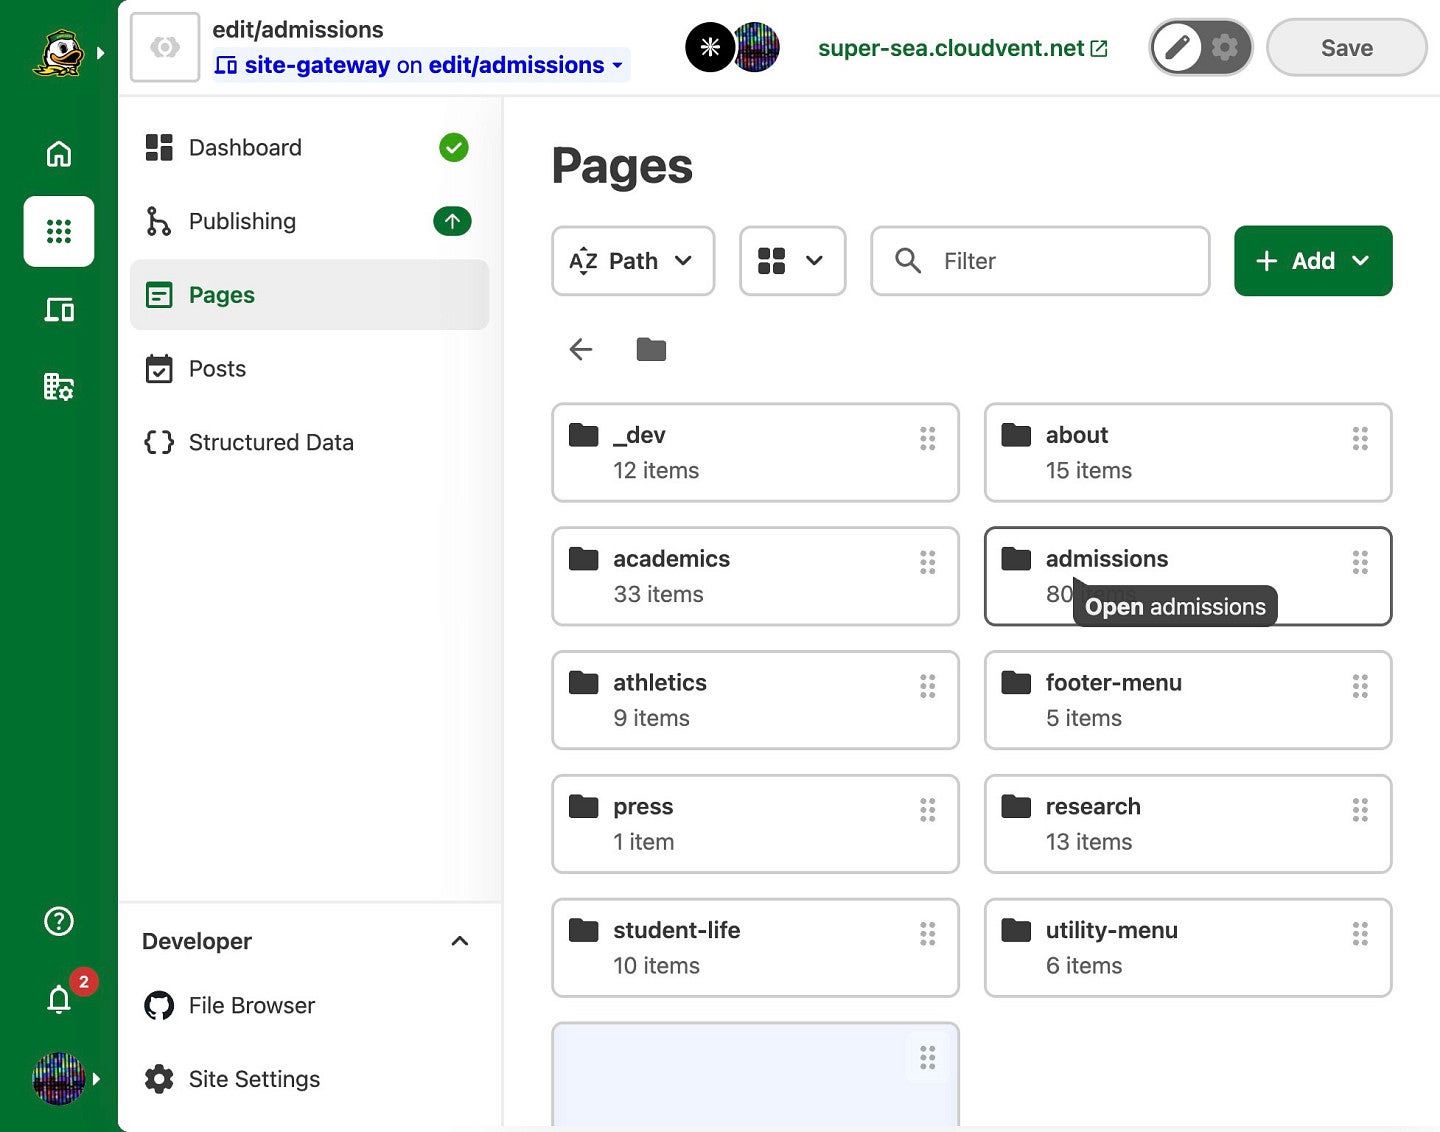
- Select Pages to browse the site's pages and folders.
- Open the "admissions" folder.
- Select How to Apply to open it in the editor.
Choose Your Editor
Pick Visual Editor or Data Editor. Both edit the same content — the Data Editor shows every field as text fields, and the Visual Editor shows those fields within the page visual layout.
Edit the Basics
- Select Title to change the page's name.
- Select Description to update the summary text visitors see in search results.
Edit Content Sections
- Select a content section, for example, the Hero - Minimal Molecule item, to update its text and image.
- Update a breadcrumb's URL or label the same way: breadcrumbs are the page-location links at the top of the site (Admissions → How to Apply).
- Select Back at the top left of an edit item to return to the previous section, or X, on the top right, to close that editor window entirely.
- Inside a section, select a Molecule item (such as Heading, Accent Color, Image, Body content, or CTA) to edit just that piece.
- Keep headings in standard order and short; body text can run longer, but check it at a few screen sizes before saving.
- Keep call-to-action (CTA) button text short and specific about what it does and never use something like "click here" as it does not provide users any information about what the link does. You can also adjust a CTA's label, color, size, or icon as needed.
- You can also find more page options in the side menu (toggle it with the vertical button on the left).
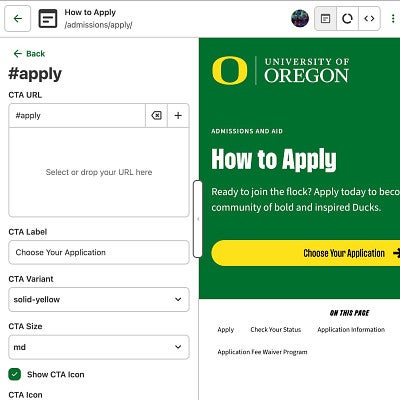
More detail: CloudCannon's URL input article (for CTA links) and UO's Dos and Don'ts page (for link and button wording).
Edit Directly on the Page
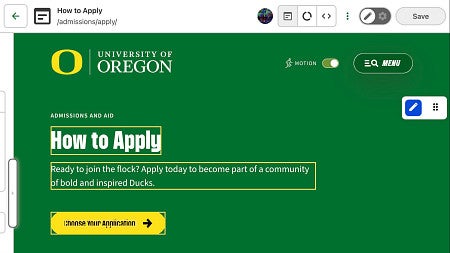
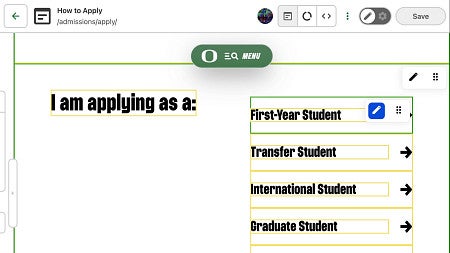
- In Visual Editor mode, select the pencil icon in the top right of any content item to edit it directly.
- Some items are nested, so you may see more than one pencil icon close together, just select the outer one to edit the whole item, or an inner one to edit just that Molecule.
- Add or edit links inside body text using the Link button in the text toolbar.
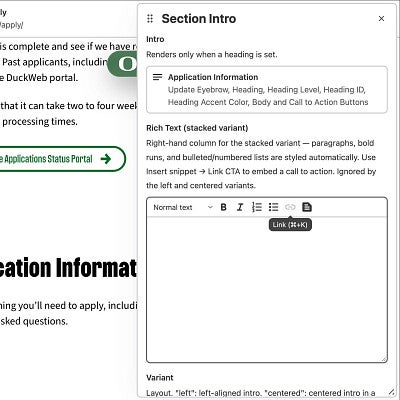
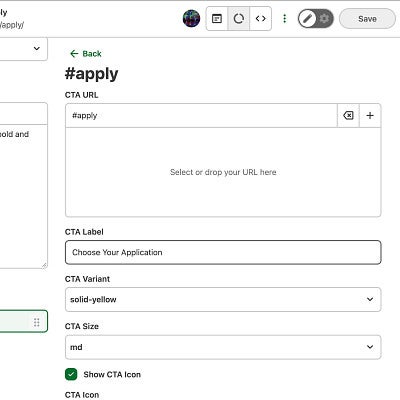
More details: CloudCannon's Rich Text input article covers the Link button.
Tips and Troubleshooting
- Never use "click here" for links or buttons. Use text that describes exactly where it goes, like "Choose Your Application."
- Keep headings in order. Don't skip from a top-level heading straight to a sub-sub-heading.
- Test on multiple screen sizes. Text that looks fine on a desktop can crowd a phone screen.
- Seeing multiple pencil icons close together? Content Molecules are often nested — the outer icon edits the whole item, an inner one edits just that piece.
- Didn't mean to change something? Use the Back link to return to the previous section without saving, or close the editor with the X in the top right.
If you get stuck, contact your site's CloudCannon administrator or University Communications.
Further reading: UO's Dos and Don'ts and Best Practices Quick Reference, and CloudCannon's Introduction to Editing.
Coming Soon
As part of our new workflow we hope to introduce more opportunities for Units on campus to coordinate and collaborate with each other, both on the Gateway website, and as a reflection of content on their own Unit websites.
With this new process we will be creating a shared and living document with update guidelines, key content update deadlines, and a shared list of who is responsible for managing pages within the Gateway website.
Our hope is for this process to help smooth the update process out so that content on both the Gateway and Unit websites remain updated on a consistent basis and we have a reduced number of outdated pages and content across the university.
Once we've gotten this shared document ready, we will post a link to it here, in the Web Community of Practice, and through email channels.
Additional Resources
- UO Writing for the Web
- UO Dos and Don'ts
- UO Best Practices Quick Reference
- CloudCannon: Introduction to the CloudCannon UI
- CloudCannon: What is the Visual Editor?
- CloudCannon: What is the Data Editor?
- CloudCannon: Save your changes
- CloudCannon: Introduction to Syncing & Publishing
- CloudCannon: What is a File input?