Your website navigation is a system of menus and links that allow site visitors to access your webpages. The navigation gives your website structure and guides visitors to the information offered on your site.
The menu labels you choose should help site visitors quickly understand the topics covered on each page. Use short, general terms and keywords that you know your audience will be looking for.
The primary navigation (your most general content) is displayed horizontally across the top of your site. This primary navigation bar is visible on every page on your site. Your secondary, tertiary, etc. navigation (your more specific content) appears vertically on the left side of the pages on your site. This is sometimes called the left-hand navigation or subnavigation.
Add Content to your Website Navigation
To add a page to your navigation:
- Begin editing the page you want to add to the menu.
- Scroll down and click on the Menu Settings section.
- Check the box next to "Provide a menu link".
- Add your menu label to the "Menu link title" field.
- Use keywords that are clear and meaningful to your audience.
- Limit each menu label to 2 to 3 words to keep labels from wrapping to the next line.
- Use words that appear in the corresponding page title for consistency (the page title can be longer). For example, the page title "Renewable Energy Technologies for a Sustainable Future" could be shortened to "Renewable Energy" for the menu label.
Click the dropdown menu below "Parent link" and select the appropriate parent page from the list. The parent page is the page directly above the current page in the menu. To add your page to the top-level, primary navigation, choose the <Main Menu> option.
In the example below, the parent page selected is the "Content" page.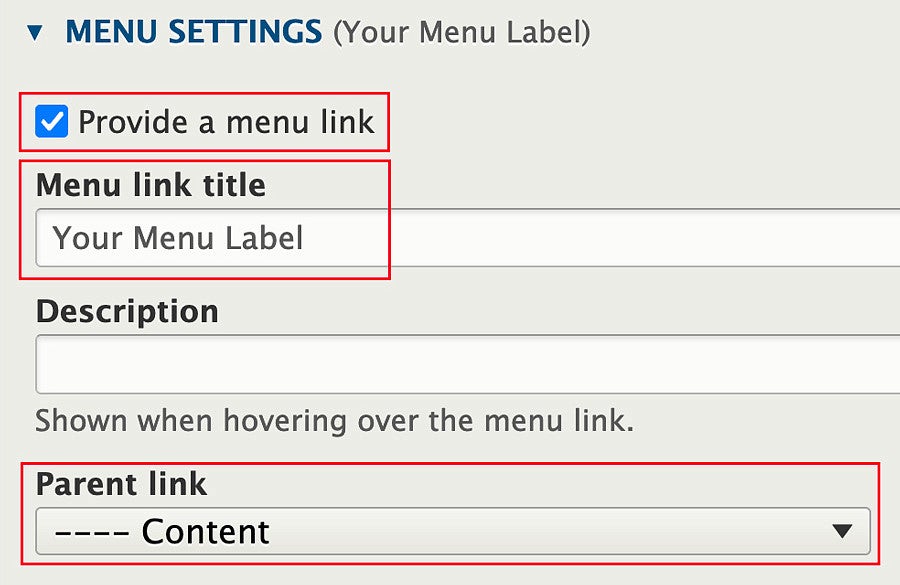
- Check the box next to "Provide a menu link".
Change the Order of Pages in the Navigation
To change the order of the pages in your main navigation, click on the "Navigation Menu" link, found under the "Shortcuts" top menu.

This will take you to your site's main menu section where you can edit or move your menu items:
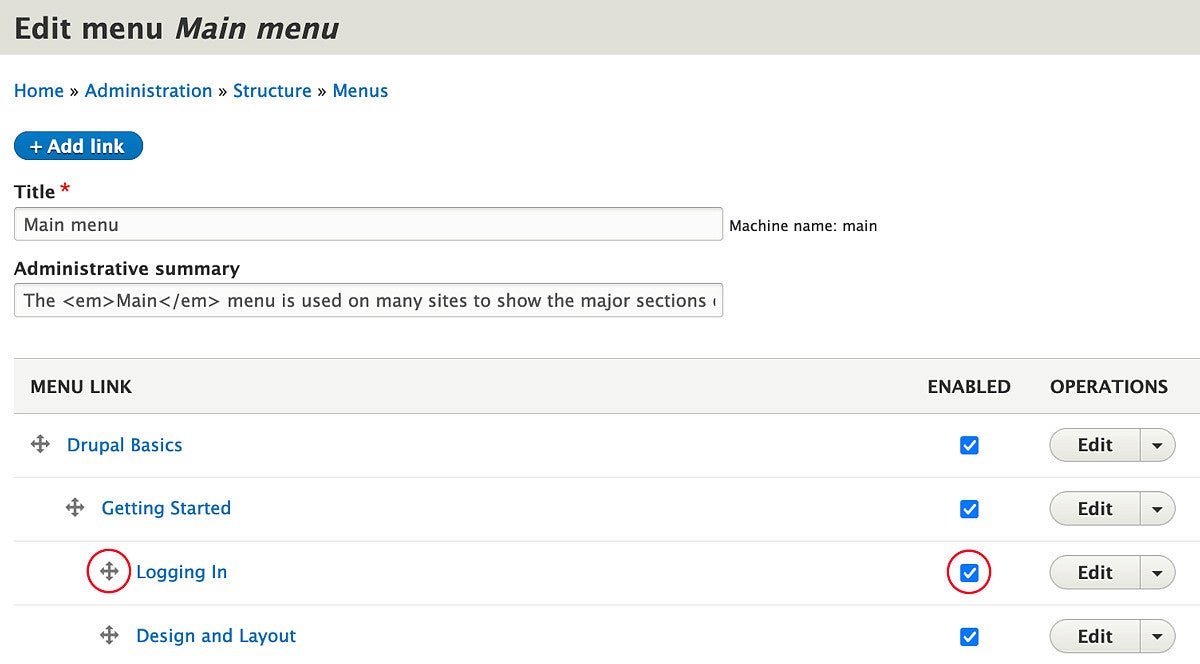
Click the crossed arrows icon and drag the items to reorder the menu.
Drag an item underneath and to the right of a menu item to add it to the sub-menu below that item. In the example above, the "Logging In" page is in the secondary navigation of the "Getting Started" page.
A menu item will be visible if there is a check mark in the "Enabled" column. Uncheck this box if you want to keep the page in the administrative menu structure while having it hidden from the published menu.
Once you have finished making changes, scroll to the bottom and click the blue Save button to publish your changes. Your changes will not be saved until you click the Save button and will be lost if you navigate away from the page before saving.
Add Custom Menu Items
If you need to add a custom menu item to your menu—a document, a link to a page on a different website, etc., go to the Navigation Menu shortcut as described in the Change the Order of Pages in the Navigation section above.
- Click on the blue "Add link" button at the top of the page:
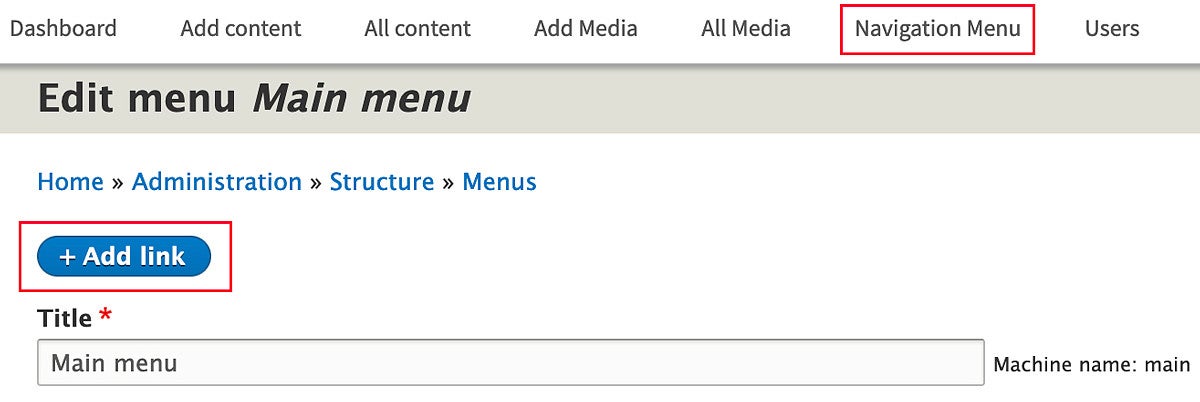
- Enter the text you would like to use as the menu label in the "Menu link title" field.
- In the "Link" field, add the URL that the menu label will link to. The URL can be either an internal or an external link. If it is an internal link, make sure you use a relative path like: /pageURLname (without including the sitename.uoregon.edu part of the URL).
- Click the dropdown menu below the Parent item and select the desired parent page. The parent item is the page directly above where you want your page to appear in the site structure. To add your page to the primary navigation, choose the <Main menu> option from the Parent item drop down, which is selected by default.
Add a Promoted Section
A Promoted Section is a portion of a site that provides a "site within a site" look and feel. This visually changes the site name in the header. It also replaces the primary navigation with the top-level pages in this portion of the site. The section is defined by the menu structure of pages in the "Promoted Section" menu.
The Promoted Section option is not enabled by default. Please contact the Digital team to schedule a consultation to discuss the limitations of this feature and how a Promoted Section could be implemented on your specific site.
First Steps
Before adding a Promoted Section to your website, plan your menu structure as you would when creating a new website.
- Select 5 to 7 pages that will form your top-level, primary navigation.
- Decide which subpages will be added underneath each top-level page, if applicable.
- If you are creating new pages for this section, select page titles and menu labels for your pages. (By choosing page titles and menu labels in advance, you can quickly establish the structure of your Promoted Section by creating empty, unpublished pages. Content can be added at a later time.)
- Guidelines for choosing page titles and menu labels:
- Use keywords that are clear and meaningful to your audience.
- Limit each menu label to 2 to 3 words to keep labels from wrapping to the next line.
- Use words that appear in the corresponding page title for consistency (the page title can be longer). For example, the page title "Renewable Energy Technologies for a Sustainable Future" could be shortened to "Renewable Energy" for the menu label.
- Guidelines for choosing page titles and menu labels:
Create the Promoted Section Homepage
While logged in, click on the Content button in the upper left corner of your site, then click the blue Add Content button.
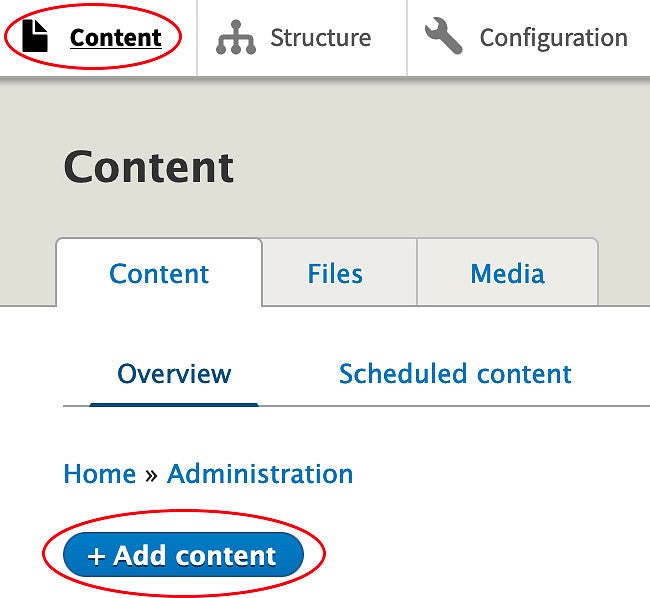
- Select "Marketing Page" from the list of content types.
Add the page title to the Title field. This will be the overarching title for your Promoted Section. It will be displayed in your site header like "Annual Report 2022-23" is displayed in the example screenshot below:

The title of your main website will be displayed above the Promoted Section title. It will be automatically linked to your main website's homepage.
In the example above, the parent website is University Communications. The "University Communications" text is linked to the homepage of the University Communications website.Scroll down and click on Menu Settings. Check the box next to "Provide a menu link". Add your Promoted Section title to the "Menu link title" field. Then click the dropdown menu below "Parent link" and select "Promoted Sections" from the list.
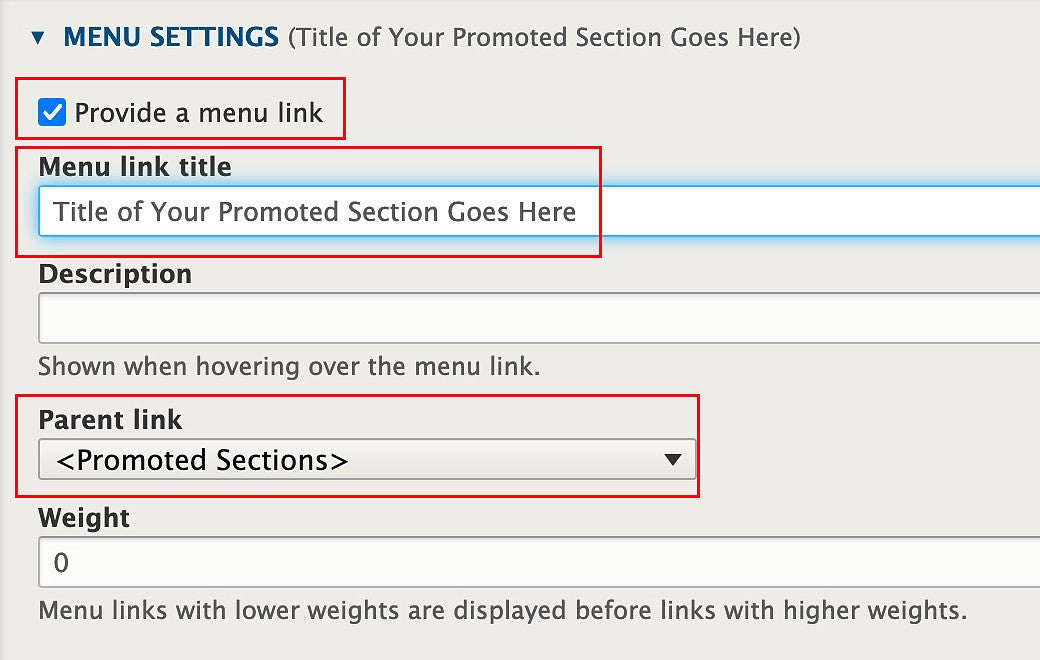
- Uncheck the box next to Published at the bottom of the page if you want this page to stay unpublished while you are building the Promoted Section.
Click the blue Save button. Your page has now been added to your navigational structure, which you can view and edit in the Structure admin area on your site. Look for Promoted Sections in the list, and click the "Edit menu" button on the right.

Create the Top-Level Navigation
To create the top-level, primary navigation for your Promoted Section, you will need to add pages to the menu underneath the section's homepage.
You can use Marketing Pages, Basic Pages, or Articles for these top-level pages. All have slightly different features, so you will have to decide what works for your specific content needs. You may need to copy existing content into a new page that is set up as your preferred content type.
As an example, the University Communications Annual Report uses two content types:
You can use existing pages as top-level pages, or you can create new pages.
- Navigate to an existing page that you would like to add to the primary navigation of your Promoted Section and click Edit.
OR
Create a new Marketing Page, Basic Page, or Article, depending on your content needs. Add a title to the Title field. - Scroll down and click on the Menu Settings section.
- Make sure the box next to "Provide a menu link" is checked.
- Add your menu label to the "Menu link title" field.
Click the dropdown menu below "Parent link" and select your Promoted Section from the list.
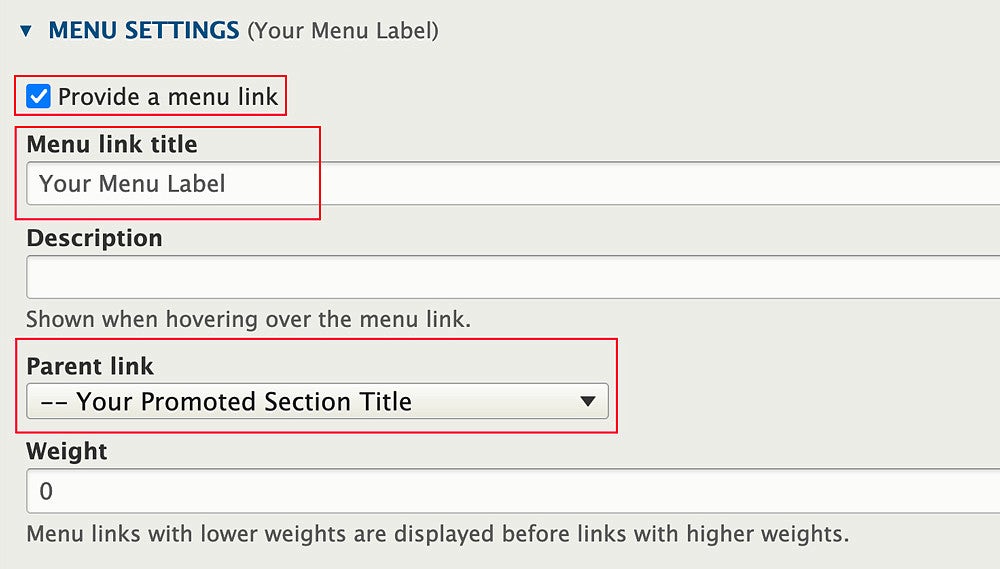
- You have the option to select a URL alias for the page that accurately reflects the page's location on your site within the menu hierarchy.
For example, if you were moving a Renewable Energy page that was originally located under a Faculty Research page and the URL was "example.uoregon.edu/faculty-research/renewable-energy", you could change the URL to reflect the new location of the page under a Promoted Section called "Sustainable Technologies": "example.uoregon.edu/sustainable-technologies/renewable-energy".
To edit the URL alias for the page:- Click on "URL Alias" below the Menu Settings section.
- Uncheck the box next to "Generate automatic URL alias" if it is checked.
Add an alternative path starting with the slash that comes after the domain name. In the example given above, the URL alias would be: /sustainable-technologies/renewable-energy

- Once you save the page, this URL alias will become the active URL for the page. The previous page URL will be added to the URL Redirects section. Any web traffic arriving at the old URL will be redirected to the new URL.
- Click the checkbox next to "Published" at the bottom of the page if you want your page to be unpublished.
- Click the blue "Save" button. Your page has now been added to the Promoted Section as a top-level navigation item.
- Repeat this process with your additional top-level navigation pages.
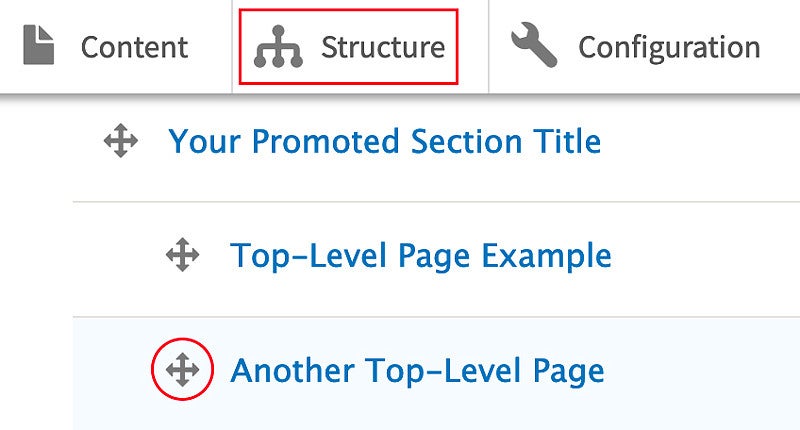
Set Up Subpages
If your Promoted Section will have subpages underneath your top-level pages, set up your subpages as either Basic Pages or Articles in order to create a sidebar menu.
- Edit the existing Basic Page or Article you would like to move, or create a new Basic Page or Article and add a title to the Title field.
- Scroll down to the Menu Settings section.
- Make sure the box next to "Provide a menu link" is checked.
- Add your menu label to the "Menu link title" field.
Click the dropdown menu below "Parent link" and select the appropriate parent page from the Promoted Section portion of the list.

- Create a custom URL alias as described in the section above, if desired.
- Click the blue "Save" button. Your page has now been added to the Promoted Section as a subpage. You can adjust the order of your pages in the Structure admin area as described in the previous section.
