Every content item on a Drupal site has an automatically generated URL which includes a system path—a path that includes a unique numerical identifier, such as /node/123. A system path does not change, and represents the true location for a piece of content on a given site.
System paths do not provide meaning about your content, so Drupal can also assign alternative human readable paths known as URL aliases, producing URLs that are easier to remember and share. As an example, this page has the URL alias: /drupal/custom-aliases.
On sites managed by UO Communications, URL aliases are automatically generated from the page title by default—but it is also possible for content editors to customize a URL alias.
When page titles change, or content is moved from one page to another, URL redirects help to ensure old paths continue to send visitors to the correct place instead of showing them an error message.
Customize a URL Alias
You may wish to customize a URL alias in order to:
- make the path to the content shorter and/or more memorable
- add a contextual hint to the path, such as the section the content belongs to or a topic the content is associated with
The steps below will help you disable the automatic URL alias generation, and supply your own URL alias.
- Go to the page with the URL alias you wish to modify, then click “Edit.”
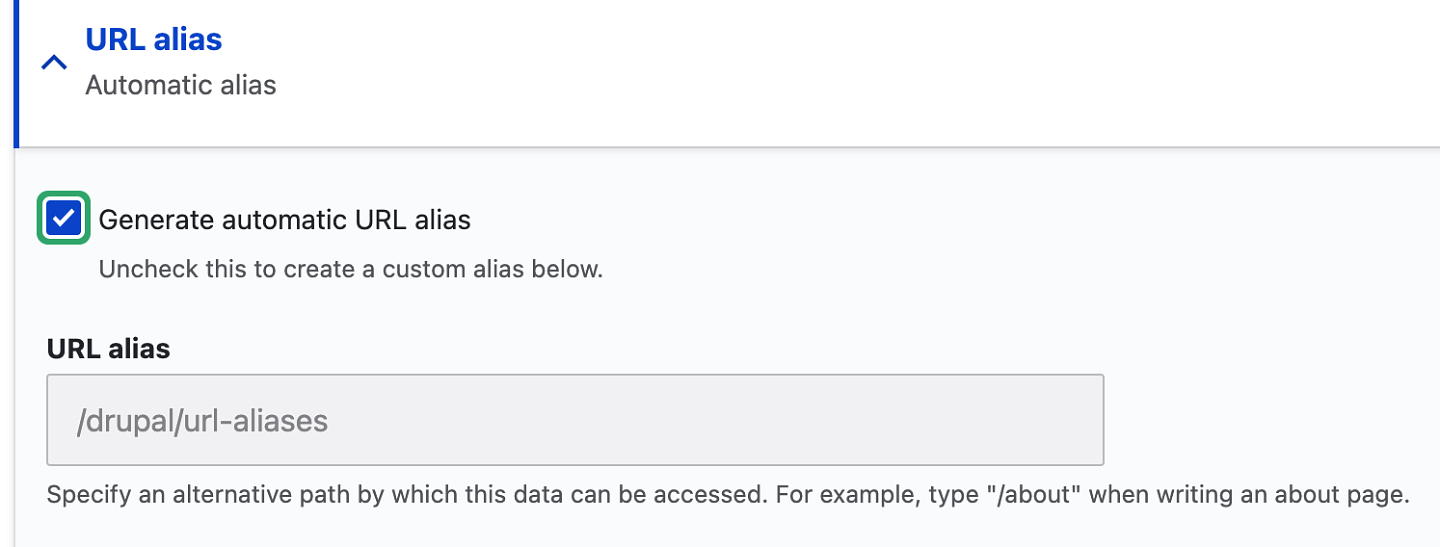
At the bottom of the edit screen, click on the "URL alias" heading to expand the URL alias pane.

If you have not previously modified the URL alias, "Generate automatic URL alias" will be checked and the existing alias will be based on the current title of the page.
- If not unchecked, uncheck the "Generate automatic URL alias" box.
Type in the new URL alias in the URL alias box, and save the content.

When creating or customizing URL aliases:
- DO NOT use special characters (&, @, !, %)—use only letters, numbers, and dashes.
- DO NOT use acronyms—if you need a shorter URL, you can use an acronym in a URL Redirect.
- DO NOT put spaces between words—use one word ("title") and use dashes instead of spaces ("your-page-title".)
Important: To preserve continuity, Drupal will automatically create a new URL redirect pointing a URL alias to the content's system path when:
- updating that content's page title (with automatic alias generation enabled)
- customizing the content's URL alias
Redirects for a page are listed under the URL redirects heading in the page edit form—but this list may not be exhaustive.
To see all URL redirects for your content, use the URL redirects administration screen at Manage > Configuration > URL redirects.

(It is also possible to see all URL aliases assigned to your content using the URL aliases administration screen at Manage > Configuration > URL aliases.)
Some redirects may also happen at a higher level - outside your site. For more information about any of your redirects please submit a ticket.
URL Redirects
Implement a URL redirect in order to:
- ensure a previously used path continues to take users to relevant content
- provide users with a shortened URL for printed materials
When adding a URL redirect, ensure that the path you want to use is not already in use in an existing URL alias (or redirect) by testing the desired URL in your browser address bar. Any path not in use should result in a "Page not found" error page.
Caution: Paths assigned as URL aliases to either published pages or unpublished pages will not be redirected. Ensure a path you are attempting to redirect from is not assigned to any content as its URL alias.
Adding a URL redirect while editing a page
Click on the "URL Redirects" heading to expand the URL Redirects pane.

Click on the "Add URL redirect" button.

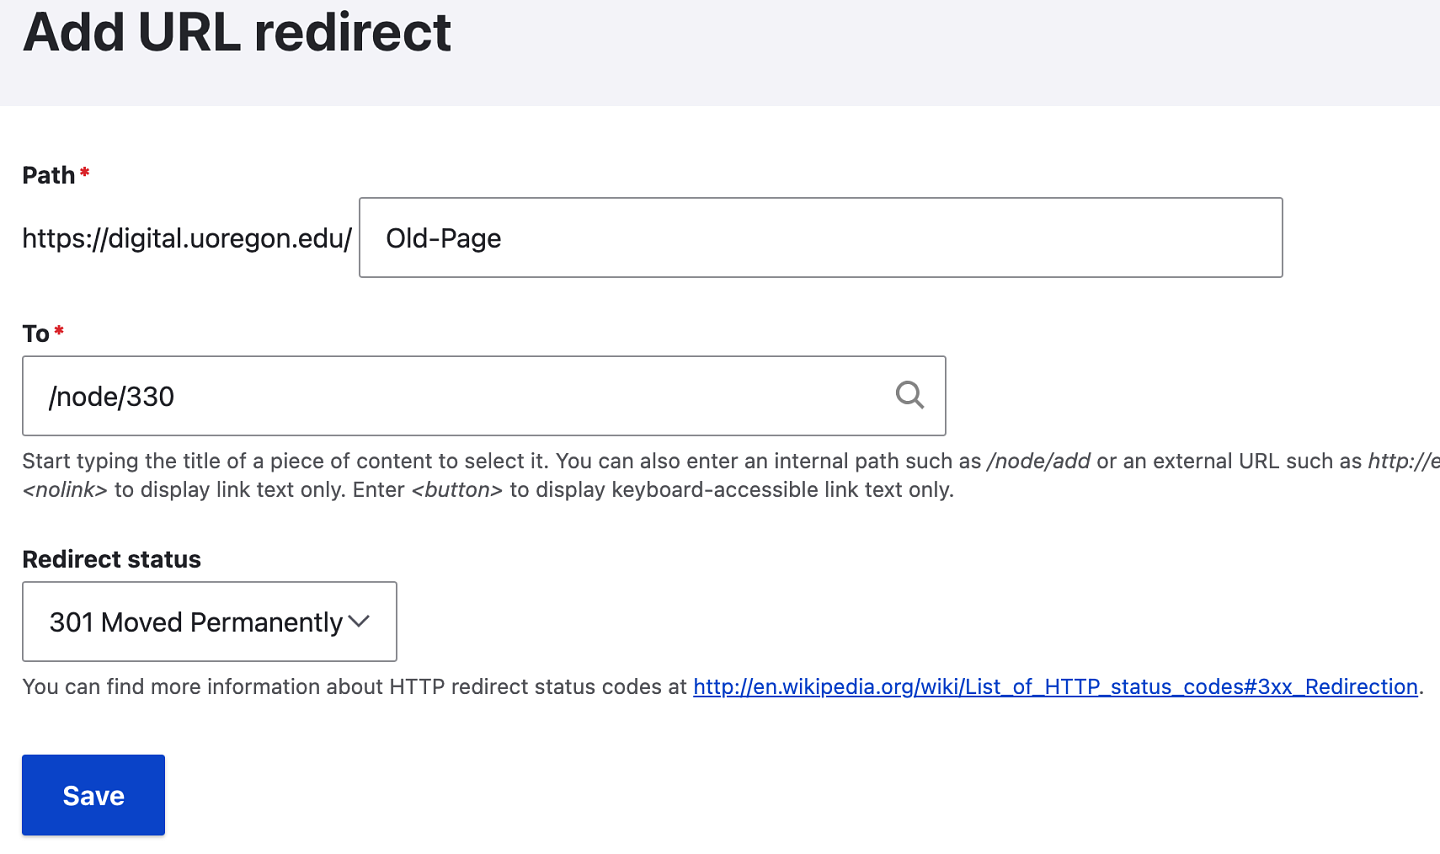
In the "Path" field enter the path you wish to redirect to the page being edited and click "Save".
(Drupal will have automatically populated the "To" field with the system path from the page you were editing.)
In the example below the Path "/Old-Page" will be redirected to an updated page which has the system path of "/node/330".

Redirects can also be created from Manage > Configuration > URL Redirects.
Redirect Troubleshooting
When a URL redirect is not working as expected:
Try different browsers and verify that the redirect does not work when using an "incognito" or "private" browser window.
Sometimes redirect issues are caused by browser caching and in some circumstances as a logged in user you will bypass redirection.
Ensure that the path you are attempting to redirect from is not currently assigned as a URL alias for any published or unpublished content on your site.
Any path still assigned to pages as a URL alias (regardless of published state) will not be redirected.
Ensure that the path you are redirecting to (the value entered in the redirect configuration's "To" field) is not also being redirected. This can cause a redirect loop which will prevent users from reaching the content.
Caution: Both redirect loops (page A to B to A) and long "chains" of redirects (page A to B to C to D) have the potential to cause damage to your site's SEO rankings and make it difficult for site users to find your content so both should be avoided.
If you require further assistance with redirects, please submit a help ticket.
Batch Redirects
When your needs dictate the creation of a significant number of redirects (10+) at one time, a batch import process using Excel spreadsheet is available. If you create a spreadsheet that has the paths of the old content and the system paths for the new content, you can send the file to us and we can run the import.
An example URL redirect spreadsheet with the old paths to the new system paths is shown below:


