The Drupal content editor is a rich text editor that allows users to create content for the body of their website with little or no HTML knowledge required. Non-technical users can easily build and maintain a website without relying on Marketing Communications staff.
Many of the elements are similar to using Microsoft Word, so in this tutorial we will cover the more uncommon tools. Below is a quick overview describing all of the buttons located in the DCE menu. Click on a menu item below to see how to use it:
Bold, Italics, and Strikethrough
Click these buttons to set bold, italics, and strikethrough as you would in a Word document.
Align Text
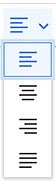
Click this button to open a list of text alignment options. The editor defaults to left align, however you can also use the center align, right align, and justify options if needed.
Indents
Click the right button to increase the indent. When used with a bullet list, this will move the line of bullets to the right, nesting them. If the indent is too great, click the left button to decrease it.
Bulleted and Numbered Lists
Click these buttons to create bulleted and numbered lists. Click the arrow next to the numbered list icon to set the starting number or reverse the numerical order. Ordered, or numbered lists can have additional formatting to change the look of the numbered items.
Links
Use this button to add a link to a webpage, email, or bookmark/page anchor.
Highlight the text you would like to link on and click the link button.
Paste or type the URL you would like to link to in the text box, and click the Save button, which features a green check mark.

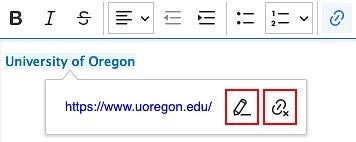
To edit or remove an existing link, click on the link text and a menu will pop up below the link.
Click on the pencil to edit the link, or click the unlink icon to remove the link.
See the Links Page for more information about creating links.
Bookmarks (Anchor/Jump Links)
This button allows you to place a bookmark, also known as an anchor or jump link, within your content. A bookmark is an internal link that goes to a chosen location within a page on your site. For example, this page uses bookmarks at the top of the page so that each Drupal menu icon links to the relevant section below.
This replaces the previous anchor link button shown below.
You can find detailed instructions for creating bookmarks on the Links page.
Linking to Bookmarks/Anchors
To link to this bookmark from within the page, begin the link URL with # and then add the bookmark ID. For example, the link URL could be: #create-bookmark.
To link to this bookmark from a different page within the same website, use a relative link. Example: /drupal/content-editor#create-bookmark
To link to this bookmark from an outside source like an email or another website, add # and the bookmark ID to the end of the URL. Example: https://digital.uoregon.edu/drupal/content-editor#create-bookmark
After you save the page, it's a good practice to test the bookmark link to make sure it is working as you intended.
Insert Media
This button allows you to upload an image to the media library, or browse existing media library images, and place the image on the page. Visit our Images page to learn more about using images on your website.
Superscript and Subscript
These are the superscript and subscript buttons. The superscript icon is the one on the left that looks like X squared. This is a superscript example: High Text and this is a subscript example: Low text
Block Quote
Insert a block quote using the block quote button. A block quote offsets the text from other paragraphs and can be a good way to draw attention to or highlight a section of your content.
Horizontal Line
This is the horizontal line button. When placed between paragraphs, the horizontal line will run the width of your content.
Note: Images or text that are aligned or floated to the left or right can cause the line to not run the whole width of the content, so it is something to be aware of when you use horizontal lines.
Special Characters
Use this button to add special characters (—, ©, ™, ¢, £, ≈, etc.). When you click on this button it will open a pop-up window with more than 100 different letters and characters you can insert into your content.
To insert a character, put your cursor where you want the new character, click on the character you want and it will automatically be added to your content.
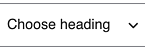
Choose Heading
Use this drop-down menu to select heading styles for section headers. Paragraphs should use the default Paragraph style. See the header instructions for more information.
Undo and Redo
These buttons allow you to undo a change or redo a change that you have made to your content.
NOTE: These buttons do not work while editing in the Source view.
Remove Formatting
Use this button to remove formatting. When you paste the content into the body content area and it doesn't look like it should, you can use the remove formatting button to try to fix it.
NOTE: Sometimes text will need to be retyped or copied again in order to fix visual issues depending on the cause of the problem.
Source Code
Click this button to view or edit the HTML source code.
Note: At this time it is not possible to undo edits made in the Source view using the undo button or keyboard shortcuts. You can click the Source button to return to the normal editing view and then click undo, however, you will erase all changes you just made while in Source view.
Templates
Use this UO Edit Suite Templates button to select and add a template to your content. See the template instructions for more information.
Insert UO Calendar
Use this button to insert a calendar on your page. Visit our Dynamic Content page to learn how to insert a UO calendar.
Embed iFrame (Use to add videos)
Use this button to add YouTube or Vimeo videos as iFrames. See the video instructions for more information.
Insert View
Use this button to insert a dynamic news feed on your page. You can set up automatic feeds using tags on article pages. Visit our Dynamic Content page for more information on Article and External Article News Feeds.
Hide Template Border Boxes
Use this button to hide or show template border boxes, which are only visible as a guide inside the editor. This is new as of 03/20/25.